Creating an API with Ruby on Rails

I am a developer from Nairobi, Kenya with a particular interest in Software Development
This tutorial will explore creating an Application Programming Interface with Ruby on Rails 7. An Application Programming Interface is an intermediary that allows communication between a client(frontend website or mobile application) with a backend database. Information is sent back and forth via the API. APIs are very useful in that they allow data exchange between software.
Initializing the Rails Backend API
The code below will generate an API because we include the flag --api. The flag --minimal will allow us to create a lightweight version. You can add a flag for the database specification, i.e --database=postgresql, the default is SQLite3.
rails new <name of the app> --api --minimal
rails new superheroes --api --minimal
Creating the Models, Controllers, and Routes
To create the models, routes, and controllers there is a rails generator called resource which is a great way to generate resources and reduce bugs in your code. The --no-test-framework will create resources without test files.
rails g resource Model attribute_name:datatype attribute_name:datatype --no-test-framework
 rails g resource HeroPower strength:string --no-test-framework
 rails g resource Power name:string description:string --no-test-framework
 rails g resource Hero name:string super_name:string --no-test-framework
Adding Associations to Models
The models have the following associations that need to be handled:
- A Hero has many Powers through HeroPower
- A Power has many Heros through HeroPower
- A HeroPower belongs to a Hero and belongs to a Power
The associations are handled as follows:
#app/models/power.rb
class Power < ApplicationRecord
    #model associations
    has_many :hero_powers
    has_many :heroes, through: :hero_powers
end
#app/models/hero.rb
class Hero < ApplicationRecord
     #model associations
    has_many :hero_powers
    has_many :powers, through: :hero_powers
end
#app/models/heropower.rb
class HeroPower < ApplicationRecord
     #model associations
    belongs_to :hero
    belongs_to :power
end
After establishing the association run migrations to reflect the associations in the DB
rails db:migrate
Adding Validations to Models
We shall add validations to prevent invalid data from entering the database and bringing errors later on. The validations we shall include are:
Add validations to the HeroPower model:
- strength must be one of the following values: 'Strong', 'Weak', 'Average'
Add validations to the Power model:
- description must be present and at least 20 characters long
#app/models/power.rb
class Power < ApplicationRecord
    #validations
    validates :description, presence: true, length: {minimum: 20}
    #model associations
    has_many :hero_powers
    has_many :heroes, through: :hero_powers
end
#app/models/heropower.rb
class HeroPower < ApplicationRecord
     #model associations
    belongs_to :hero
    belongs_to :power
    #validations
    validates :strength, inclusion: {in: %w(Strong  Weak  Average)}

end
Starting the Database
In this step, we shall create the database and make the initial migrations to create the columns in the database.
$ rails db:create
$ rails db:migrate
Generating a Migration
Forgot a column? You can create a migration to add the column that is left out as well as remove any you feel is unnecessary. To do the remove action replace add with remove in the command below.
rails g migration add_<COLUMN>_to_<TABLE NAME> <COLUMN>:<TYPE>
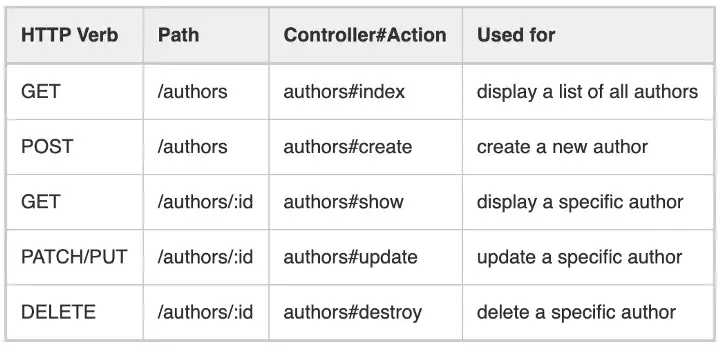
Creating Routes
In this step, we shall create the routes for the various actions where a user can create, update and see all the different data in the various models.
#config/routes.rb
Rails.application.routes.draw do
  resources :heros, only: [:index, :show]
  resources :powers, only: [:index, :show, :update ]
  resources :hero_powers, only: [:create]

end
Creating Custom Routes
If you wish to create your routes you can use the following syntax to achieve that.
<HTTP VERB> '<PATH>', to: '<CONTROLLER>#<ACTION>'
#example custom route
get 'powers', to: 'powers#index'
Creating Controller Actions
The controllers were already generated for us with the resource generators so what we shall do is go ahead and add the controller actions for the various routes as specified above.
#app/controllers/hero_powers_controllers.rb
class HeroPowersController < ApplicationController

    rescue_from ActiveRecord::RecordInvalid, with: :unprocessable_entity
   # POST  request
   def create
     hero_power = HeroPower.create!(hero_power_params)
     render json: hero_power.hero, serializer: HeroPowerSerializer, status: :created
   end

   private

   def hero_power_params
     params.permit(:strength, :power_id, :hero_id)
   end

   def unprocessable_entity(invalid)
     render json: { errors: invalid.record.errors.full_messages}, status: :unprocessable_entity
   end
end
#app/controllers/powers_controllers.rb
class PowersController < ApplicationController

  # GET request
  def index
    powers = Power.all
    render json: powers
  end

  #  GET request for specific id
  def show
    power = Power.find(params[:id])
    render json: power
  end

  # PATCH request to update power
  def update
    #find
    power = Power.find(params[:id])
    # update
    power.update!(power_params)
    render json: power
  end

  private

  def power_params
    params.permit(:id, :name, :description)
  end
  #error handling
  def unprocessable_entity(invalid)
    render json: { errors: invalid.record.errors.full_messages}, status: :unprocessable_entity
  end

  def power_not_found
    render json: { error: "Power not found" }, status: :not_found
  end
end
#app/controllers/heros_controllers.rb
class HerosController < ApplicationController
    rescue_from ActiveRecord::RecordNotFound, with: :hero_not_found

    #GET request
    def index
        heroes = Hero.all
        render json: heroes,  status: :ok
    end

    # GET request for each hero
    def show
        #find
        hero = Hero.find(params[:id])
        #show
        render json: hero, serializer: HeroPowerSerializer, status: :ok
    end

    #error handling
    private
    def hero_not_found
        render json: {error: "Hero not found"}, status: :not_found
    end
end
Testing the API
Seeding the database
To check if the endpoints are working , we need to add some data by seeding the database. The following is an example of how to seed the database, feel free to customize it.
#db/seeds.rb
Power.create([{name:"average",description:"A hero brave at heart"},{name:"strong",description:"Asuper strong man"}])
HeroPower.create([{strength:"average"},{strength:"strong"}])
Hero.create([{name:"average",super_name:"Brave Heart"},{name:"strong",super_name:"Super Man"}])
Run the following command to seed the database.
$ rails db:seed
Starting the server
Use the command below to start the server and navigate to the link specific to your machine.
$ rails s
Testing endpoints in Postman
As of now, the API has no client to show the interaction with the backend so it is advisable to use Postman to test the endpoints to ensure they are working.
Link to the GitHub Repository
The link to the GitHub repository is here: Superheroes API. Feel free to visit and create and contribute to it.
Conclusion
This is a simple look into how to create an API with Rails 7. We have learned to use the resource generator to create the models, controllers, and routes.
Until next time, may the code be with you.