How To Create a Cryptocurrency Information Platform with HTML, CSS and Vanilla JavaScript

I am a developer from Nairobi, Kenya with a particular interest in Software Development
Cryptocurrency is taking the financial sector and the world in general by storm. According to Buy Bitcoin Worldwide, there are 200 million Bitcoin wallets and the number of daily Bitcoin users is 400,000. These statistics are an indicator of the increasing adoption of Cryptocurrency and as such traders, newbies, and skeptics would benefit from a site where they can view the changes in the market in real-time.
We shall learn how to create a Cryptocurrency Information Platform that will display information on 100 coins in real time with JavaScript. By the end of this tutorial, you will be able to create the following:
i. Fetch data from an API and display it on a web page.
ii. A like button
iii. Search functionality
This project will also boost your knowledge in JavaScript and manipulating elements in the DOM.
The Basic HTML Boilerplate
Before we jump into the features of this application let us begin with the HTML boilerplate.
<!DOCTYPE html>
<html lang="en">
    <head>
        <meta charset="UTF-8"/>
        <meta name="viewport" content="width=device-width, initial-scale=1.0"/>
        <link rel="stylesheet" href="./style/style.css"/>
        <!-- <link rel="stylesheet" href="https://maxcdn.bootstrapcdn.com/bootstrap/3.3.7/css/bootstrap.min.css"> -->
        <title>Koin Korner</title>
    </head>
<body>
    <!-- Our features go here >
<body/>
The CSS styling for the foundational single-page app is as follows:
@import url("https://fonts.googleapis.com/css2family=Poppins:ital,wght@0,400;0,900;1,700&display=swap");
:root{
--normal-font: 400;
--bold-font:600;
--bolder-font:900;
--primary-color:#465362;
--secondary-color:#011936;
--line-height:1.7rem;
--transition: 0.4 ease-in;
}
/* scroll effect smooth*/
html{
    scroll-behavior: smooth;
}
/* Resets*/
*{
    margin:0;
    padding:0;
    box-sizing: border-box;
    transition: var(--transition);
}
body{
    font-family:"Poppins",sans-serif;
}
ul li{
    list-style-type: none;
}
a{
    text-decoration: none;
    color: var(--primary-color);
}
a:hover{
    color:var(--secondary-color);
How to Make the Navigation Bar
The navigation bar or nav bar will have a logo which will be on the left and menu items on the right. We shall use an ionic Bitcoin logo and the name of the application as the logo.
<!--Navigation Bar-->
  <nav>
    <a href="#" class="logo">
<h1>
     <ion-icon name="logo-bitcoin"></ion-icon>   <span class="koin">Koin</span><span class="korner">Korner</span>
</h1>

<ul>
    <li class="nav-item">
      <a href="#" class="nav-link" id="nav-link">About Us</a>
    </li>
    <li class="nav-item">
      <a href="#" class="nav-link" id="nav-link">Contact</a>
    </li>
   <li  class="nav-item">
      <a href="#" class="nav-link" id="nav-link">Learn</a>
    </li>
   <li  class="nav-item">
     <a href="#" class="nav-link" id="nav-link">Community</a>
    </li>
</ul>
</nav>
The CSS styling for the Nav Bar is as follows:
nav{
    background: #fff;
    display: flex;
    justify-content: space-between;
    align-items: center;
    padding: 1rem 1.5rem;
    box-shadow: 2px 3px 2px #f1f1f1;
    position: sticky;
    top:0;
    left:0;
    z-index: 1;
}

.logo{
    font-size: 2rem;
    font-weight: 500;
}
ul{
    display: flex;
    justify-content: space-between;
    align-items: center;
}
.nav-item{
    margin-left: 2rem;
}
.nav-link{
    font-weight: var(--bold-font);
}
Your navbar should look something like this

How to Make the Hero Section
The hero section shall have two parts, one to the left and another to the right. The part on the left shall have a brief description of the application and two buttons for learning more and one to join the community. The part on the right shall have the social media and email subscription sections.
Part one: Application Description
<div class="intro">
  <h2>
    <span class="land">Get The Latest Prices and Market Trends </span>
   <br>
<span class="here"> In Cryptocurrency </span>
</h2>
   <p>The korner of the internet for all Crypto traders, newbies and enthusiasts.<br>Monitor the price, volume, and trends of your favourite coins.<br>KoinKorner also keeps tabs on community development, and important events.
   </p>
   <a class="btn lavender">Learn More</a>
   <a class="btn blue">Join us</a>
</div>

*Part two: Social Media and Email Subscription section*

<div class="sub" id="sub">
  <h2>Connect with us on Social Media</h2>
    <div id="socicons" >
     <a href="#"> <ion-icon size="large"name="logo-twitter"></ion-icon> </a>
     <a href="#"> <ion-icon size="large"name="logo-instagram"></ion-icon> </a>
     <a href="#"> <ion-icon size="large"name="logo-facebook"></ion-icon> </a>
</div>
  <h2>Subscribe to our newsletter for updates</h2>
        <form action="#">
          <input
            type="email"
            name="email"
            id="email-sub"
            class="email-sub"
            placeholder="Enter your email"
            required />

        <input
          type="submit"
          value="Subscribe"
          id="sub-btn"
          class="submit-btn"
          required />
      </form>
</div>
The CSS styling for the hero section is the following lines.
.hero{    display: flex;
              align-items: center;
              justify-content: space-between;
              gap:1.9rem;
              max-width: 1100px;
              margin:2rem;
              auto -6rem;}

.intro h2{    font-size: 3rem;
                   margin-bottom: 1rem;
                   text-align: left;}

.intro p{    margin-bottom: 0.5rem;
                 text-align:left;}

.hero p{    line-height: var(--line-height);}

.land{    color:var(--primary-color)}

.here{    color:var(--secondary-color)}

.btn{    margin-top: 1rem;
            display:inline-block;
            padding:0.8rem 0.6rem;
            border:none;
            color:#fff;}

.lavender{  background-color: var(--secondary-color);}

.lavender:hover{  background-color: #B5B2C2;}

.blue{  background-color: var(--secondary-color);color: #fff;}

.blue:hover{  background-color: #A0C1D1;color:#fff;}

.sub{    margin-top: 0rem;}

.sub h2{    text-align: center;}

form{    text-align: center;
             margin: 0.1rem 2 rem;}

.email-sub{    padding: 0.2rem;
                       border: 1px solid var(--primary-color);
                       border-radius: 4px;}

.email-sub:focus{    border: 1px solid var(--secondary-color);
                                 outline:none;}

.submit-btn{    background-color: var(--primary-color);
                         color: #fff;
                         padding:0.3rem;
                         margin:0.5rem;
                         border: none;
                         border-radius: 2px;
                         cursor: pointer;}

.submit-btn:hover{    background-color:  #b3b4b4;}

.sub #socicons {    font-size: 1.3rem;
                                size: large;
                                text-align: center;
                                margin: auto;}
Your hero section should look something like this

Interactivity with JavaScript:
For the Hero section, we shall give the subscribe button an onClick event to alert the user that they are subscribed to our mailing list.
const email_button = document.getElementById('sub-btn');

email_button.onclick= function(){
    alert("Subscribed");
}
How to Make the Search Feature
The search feature is an integral part of our application as it will allow the user to look up information on a particular coin.
 <!--Search feature-->
        <section class="look-up">
            <div class="search" id="search">

                <form action="#" method="GET">
                    <input
                    type="text"
                    placeholder="Search Cryptocurrency"
                    name="q"
                    class="search-bar"
                    required
                    >
                    <input
                    type="submit"
                    value="Search"
                    id="search-btn"
                    class="search-btn"
                    required
                    />
                </form>
            </div>
            <!-- for search result  -->

            <div class="search-result-container mt-1" >

                <div class="single-search-result card" id="search-results">

                </div>
            </div>
        </section>
The CSS styling for the Search Feature is as follows:
.search{
    width: 500px;
    margin:100px auto;
}
input[type="text"]{
    display: block;
    width: calc(100% - 24px);
    font-size: 18px;
    font-weight: 600;
    color: var(--primary-color);
    padding:10px;
    border: outline;
}
.search-btn{
    background-color: var(--primary-color);
    color: #fff;
    padding:0.3rem;
    margin:0.5rem;
    border: none;
    border-radius: 2px;
    cursor: pointer;
}
.search-btn:hover{
    background-color:  #b3b4b4;
}
/* search result styling */
.search-result-container{
    display: flex;
    flex-direction: column;
    justify-content: center;
    gap: 1rem;

}
.single-search-result{
    display: flex;
    flex-direction: row;
    flex-wrap: wrap;
    padding: 0.5rem 2rem;
    margin: 0rem 5rem;
    gap: 1rem;
    justify-content: space-between;
    transition: all 0.25s;
}
.single-search-result:hover{
    box-shadow: var(--primary-color);
}
.single-search-result > img{
    height: 2rem;
}
.single-search-result > h3{
    font-size: 1.5rem;
}
.single-search-result > p{
   margin: auto;
}
.single-search-result > a{
    background-color: #465362;
    border: 1px solid var(--primary-color);
    border-radius: 5px;
    cursor: pointer;
    padding: 0.25rem 1rem;
    transition: all 0.25s;
    margin-left: auto;
    text-decoration: none;
    color: #011936;
}
.single-search-result > a:hover{
    background-color: #465362;
}
Interactivity with JavaScript:
Let us go over the search feature interactivity step by step.
The first function, searchData, will be used to fetch the data from the Coin Gecko search API endpoint. First, we get the current URL and pass it as an object to params to get the query parameter 'q' that we put in our form. That will enable us to get the exact search term the user keyed in. Next, we get the search term and fetch the result from the API and convert the data to JSON format.
function searchData(){
    const currentURL =window.location.href;
    const url_obj = new URL(currentURL);
    const params = new URLSearchParams(url_obj.search);
    if(!params.has('q')){
        return;
    }
    document.getElementsByName('q')[0].value = params.get('q');
    fetch('https://api.coingecko.com/api/v3/search?query='+ params.get('q'))
    .then(resp => resp.json())
    .then(render);
}
The second function, render, defines how we shall display the search results. We shall iterate over the data array and get only coins. Then we shall proceed to display only the information we need which is the index, name, symbol, id, and the market cap rank. We shall then place all the data on a single card and display it that way.
function render(data){
    for(let i=0;i<data.coins.length;i++){
        const singleCoin = data.coins[i];
        console.log(singleCoin);
        const index = i +1;
        const logo = singleCoin.thumb;
        const name = singleCoin.name;
        const symbol = singleCoin.symbol;
        const coinId = singleCoin.id;
        const cap = singleCoin.market_cap_rank;
        createSingleCard(index, logo, name, symbol, coinId,cap);
    }
}
The third function, createSingleCard, is useful in displaying the query in our app so the user can see their search result. First, we pass in the index, logo, symbol, id, and market cap as parameters and create elements and finally append them to the DOM via the search results container.
function createSingleCard(index, logo, name, symbol, coinId,cap){
const id_elem = document.createElement('p');
if(index<10){
index = index + " ";
}
id_elem.innerHTML=index;
const logo_elem = document.createElement('img');
logo_elem.src=logo;
logo_elem.alt='Coin Logo';
const name_elem = document.createElement('h3');
name_elem.innerText=name;
const symbol_elem = document.createElement('h3');
symbol_elem.innerText=symbol;
const cap_elem = document.createElement('h3');
cap_elem.innerText= "Market Cap Rank:"+ cap;
const anchor_elem = document.createElement('a');
anchor_elem.innerText="More Info";
anchor_elem.href="#" + coinId;
const container_elem = document.createElement('div');
container_elem.classList.add('single-search-result','card');
container_elem.appendChild(id_elem);
container_elem.appendChild(logo_elem);
container_elem.appendChild(name_elem);
container_elem.appendChild(symbol_elem);
container_elem.appendChild(cap_elem);
container_elem.appendChild(anchor_elem);
document.getElementById('search-results').appendChild(container_elem);
}
Your search feature should look something like this

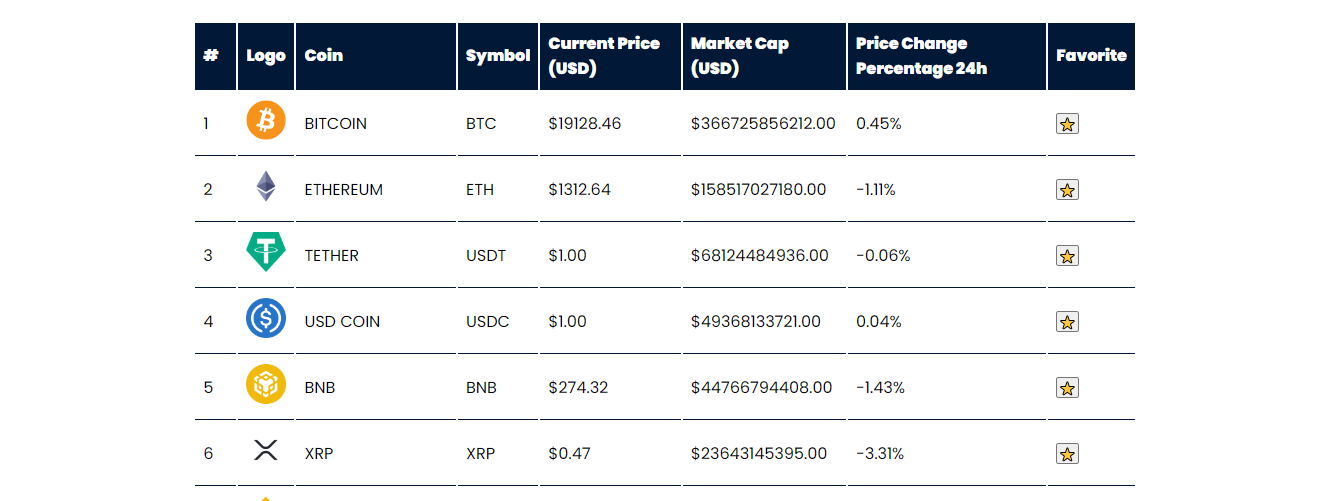
How to Make the Market Information Table
The market information table is an important feature that displays Cryptocurrency coins and information about them.
<section id="market-data-results">
            <table id="market-data-table">
                <tr>
                    <th>#</th>
                    <th>Logo</th>
                    <th>Coin</th>
                    <th>Symbol</th>
                    <th>Current Price (USD)</th>
                    <th>Market Cap (USD)</th>
                    <th>Price Change Percentage 24h</th>
                    <th>Favorite</th>
                </tr>
                <!-- Table rows are inserted when the page loads using Javascript -->
            </table>
        </section>
        <br>
The CSS styling for the information market table is as follows:
#market-data-table, #market-data-table{
    width: 70%;
    margin: 0 auto;
}
#market-data-table th{
    padding: 8px;
    text-align: left;
    padding-top: 12px;
    background-color: var(--secondary-color);
    color: white;
}
#market-data-table th, #market-data-table td{
    padding: 8px;
    border-bottom: 1px solid var(--secondary-color);
}
#market-data-table td >img{
    height: 40px;
    width: 40px;
}
Interactivity with JavaScript:
Let us go over this step by step.
The first function, marketData, is used to fetch data about the Cryptocurrency coins via an API endpoint, it is then converted to JSON format.
function marketData(){
    // const currentURL =window.location.href;
    return fetch('https://api.coingecko.com/api/v3/coins/markets?vs_currency=usd&order=market_cap_desc&per_page=100&page=1&sparkline=false')

    .then(res=>res.json())
    .then(data=>displayTable(data));

}
The second function, displayTable, is used to create the table by taking in the data as a parameter and rendering the data row-wise, and enduring each item being fetched goes in its respective cell so as to display a neat and ordered table.
function displayTable(data){
    const $resultsTable = document.getElementById('market-data-table')

    data.forEach((element,index) =>{
        renderRow(element,index)
    })

    function renderRow(element,position){
       const {image, name, symbol, market_cap, current_price, price_change_percentage_24h} =element

    // first row is taken up by the headers
    // insert a new row based on the index to the table element
    const row = $resultsTable.insertRow(position + 1)
    // each cell inserted corresponds to a row
    const numberCell = row.insertCell(0)
    const imageCell = row.insertCell(1)
    const nameCell = row.insertCell(2)
    const symbolCell = row.insertCell(3)
    const currentPriceCell =  row.insertCell(4)
    const marketCapPriceCell = row.insertCell(5)
    const priceChangeCell = row.insertCell(6)
    const likerCell = row.insertCell(7)

    const logoElement = document.createElement('img')
    logoElement.src = image;
    logoElement.alt = 'Coin-Logo';

    const likerButton = document.createElement('button');
    likerButton.innerHTML="    ⭐";
    likerButton.onclick= function(){
        alert("Liked");
    }


    numberCell.innerText = position + 1
    imageCell.appendChild(logoElement)
    nameCell.innerText = name.toUpperCase()
    symbolCell.innerText = symbol.toUpperCase()
    currentPriceCell.innerText = `$${current_price.toFixed(2)}`
    marketCapPriceCell.innerText = `$${market_cap.toFixed(2)}`
    priceChangeCell.innerText = `${price_change_percentage_24h.toFixed(2)}%`
    likerCell.appendChild(likerButton)
    }
}

// This function ensures the functions are loaded when the page completely loads.
window.onload = function(){
    searchData();
    marketData();
}
Your market data table should look something like this
How to Make the Footer
In the footer, we add the link to the Coin Gecko website for attribution purposes. © is the character entity for the © that is present in the footer on most websites. The footer is simple and is a single line of HTML.
<!--Footer Section-->
<footer>
Powered by <a href="https://www.coingecko.com/en/api/documentation">Coin Gecko API</a>
<br>
©2022. All Rights Reserved
</footer>
The CSS styling for the footer is done in the following lines.
footer{
border-top: 1px solid #f1f1f1;
box-shadow: 0px -2px 3px #f1f1f1;
text-align: center;
padding: 2rem;
align-items: center;
}
Your footer should look something like this

Conclusion You can take a look at the complete Single Page App here and the GitHub repo here. That's all for today, if you have got this far then you have learned how to create:
A search feature using data fetched from an API.
A click listener for buttons.
A market information table with data fetched from an API.
Thank you for reading and until next time, may the code be with you.