

Nest JS is the lovechild of Typescript and Node JS (hurrah type-safety for the backend). The two come together to create a modular and robust framework that is easy to scale and maintain.
This framework is ideal for developers who prefer convention over configuration as plenty of features come with the framework, for example, Decorators that define metadata for classes and Middleware that intercepts requests and responses for efficient data transmission.
Prerequisites
Ensure you have Node JS(version >= 16) installed on your machine and then proceed to the next section where we set up a REST API.
Setup
For this tutorial, we shall set up a REST API using the following steps:
Open your operating system's terminal and key in the following commands.
$ npm i -g @nestjs/cli
$ nest new blog-api
The first command installs the nest CLI globally in your system. Note: installation takes a long time so don't be alarmed.
Once done, the second command creates a project(feel free to call the project whatever name you wish). Ensure you choose REST from the options to create a REST API. The blog-api directory will have some boilerplate files, node modules, and a src folder with core files.
Setting up TypeORM
TypeORM is an object-relational mapper that supports the latest JavaScript features from small to large-scale applications.
The first step to configuring TypeORM is to install the relevant packages
npm i pg typeorm @nestjs/typeorm @nestjs/config
The packages installed are as follows:
typeorm - the package for TypeORM.
pg - a postgres driver to connect typeorm and postgres database.
@nestjs/config - Nest JS module for configuration.
@nestjs/typeorm - Nest JS module for TypeORM.
Configuring a datasource file
After installing the relevant packages, we need to configure a datasource file to enable the use of features like migrations.
A datasource is a file where the connection settings for our database. It also sets the first database connection.
A migration is a file with SQL queries that is used to modify an existing database and update its schema.
- Create a database using pgAdmin or psql CLI. If you are using the psql CLI then run the following command and add the database's name to the typeorm configs at the .env
CREATE DATABASE saccodb;
- Create a file at the root of the Nest application and call it
dataSource.ts.
It is a good security practice to have sensitive data like database configurations stored in a .env file. For the port, host, username, password, and database add the configurations in a .env file and import the environment variables to this file.
import { DataSource } from 'typeorm';
import { ConfigService } from '@nestjs/config'; //installed package
import { config } from 'dotenv';

config();

const configService = new ConfigService();

export default new DataSource({
  type: 'postgres',
  host: configService.get('TYPEORM_HOST'),
  port: configService.get('TYPEORM_PORT'),
  username: configService.get('TYPEORM_USERNAME'),
  password: configService.get('TYPEORM_PASSWORD'),
  database: configService.get('TYPEORM_DATABASE'),
  entities: ['src/**/*.entity.ts'],
  migrations: ['migrations/**/*{.ts,.js}'],
});
Let us discuss the configurations in this file:
const configService = new ConfigService();: This line creates an instance of aConfigServiceclass, which is likely a custom class used to manage configuration settings for the application. It seems to provide a way to retrieve configuration values.export default new DataSource({ ... });: This line exports a new instance of theDataSourceclass, which is the main configuration object used by TypeORM to connect to a database.Configuration Object Properties:
type: 'postgres': Specifies that PostgreSQL is the database type being used.host: configService.get('TYPEORM_HOST'): Retrieves the database host from the configuration service using the key'TYPEORM_HOST'.port: configService.get('TYPEORM_PORT'): Retrieves the database port from the configuration service using the key'TYPEORM_PORT'.username: configService.get('TYPEORM_USERNAME'): Retrieves the database username from the configuration service using the key'TYPEORM_USERNAME'.password: configService.get('TYPEORM_PASSWORD'): Retrieves the database password from the configuration service using the key'TYPEORM_PASSWORD'.database: configService.get('TYPEORM_DATABASE'): Retrieves the database name from the configuration service using the key'TYPEORM_DATABASE'.entities: ['src/**/*.entity.ts']: Specifies the paths to entity files. These files define the structure of your database tables and are used by TypeORM to interact with the database.migrations: ['migrations/**/*{.ts,.js}']: Specifies the paths to migration files. Migrations are scripts that manage changes to the database schema over time.
Create a migrations folder at the root of the Nest JS project for our migration files.
Add the following to the existing scripts in package.json to enable typeorm migrations to work.
"scripts": {
    "typeorm": "ts-node ./node_modules/typeorm/cli",
    "typeorm:run-migrations": "npm run typeorm migration:run -- -d ./dataSource.ts",
    "typeorm:generate-migration": "npm run typeorm -- -d ./dataSource.ts migration:generate",
    "typeorm:create-migration": "npm run typeorm -- migration:create",
    "typeorm:revert-migration": "npm run typeorm -- -d ./dataSource.ts migration:revert"
  },
Migrations will be done in the following way:
Make migration:
npm run typeorm:generate-migration migrations/<name_of_migration>Run migrations:
npm run typeorm:run-migrations
App module
Add the typeorm module along with the configurations to the app module at imports array.
import { Module } from '@nestjs/common';
import { AppController } from './app.controller';
import { AppService } from './app.service';
import { TypeOrmModule } from '@nestjs/typeorm';
import { join } from 'path';
import { AuthModule } from './auth/auth.module';


// eslint-disable-next-line @typescript-eslint/no-var-requires
require('dotenv').config();

const {
  TYPEORM_HOST,
  TYPEORM_USERNAME,
  TYPEORM_PASSWORD,
  TYPEORM_DATABASE,
  TYPEORM_PORT,
} = process.env;

@Module({
  imports: [TypeOrmModule.forRoot({
      type: 'postgres',
      host: TYPEORM_HOST,
      port: parseInt(TYPEORM_PORT),
      username: TYPEORM_USERNAME,
      password: TYPEORM_PASSWORD,
      database: TYPEORM_DATABASE,
      entities: [join(__dirname, '**', '*.entity.{ts,js}')],
    }),
    AuthModule,
  ],
  controllers: [AppController],
  providers: [AppService],
})
export class AppModule {}
Adding the user authentication feature
User authentication is an important feature in any application. It allows users to create accounts in our application and access features provided therein. It is also a security measure to protect user data.
To create this feature we shall make use of the resource generator in Nest.
nest g resource auth
It generates the entity, controller, module, and service files we require for this feature.
User Entity
The first thing we do is to model the user. We shall create the database columns or the user entity.
//user.entity.ts
import {BaseEntity, PrimaryGeneratedColumn, Entity, Column, Unique,
OneToMany,} from 'typeorm';
import * as bcrypt from 'bcrypt';

@Entity()
@Unique(['email'])
export class User extends BaseEntity {
  @PrimaryGeneratedColumn('uuid')
  id: string;

  @Column()
  username: string;

  @Column()
  email: string;

  @Column()
  password: string;

  @Column()
  salt: string;

  async validatePassword(password: string): Promise<boolean> {
    const hash = await bcrypt.hash(password, this.salt);
    return hash === this.password;
  }
}
Let us discuss the code in this file.
@Entity(): This decorator indicates that the classUseris an entity, representing a database table. In this case, it represents the "User" table.@Unique(['email']): This decorator specifies that the "email" column in the "User" table should have unique values. This helps enforce uniqueness for email addresses in the database.export class User extends BaseEntity { ... }: This defines theUserclass, which extendsBaseEntity.BaseEntityis a class provided by TypeORM that contains common properties and methods for entities.@PrimaryGeneratedColumn('uuid'): This decorator indicates that theidproperty is a primary key column that will be generated using UUIDs (Universally Unique Identifiers).@Column(): These decorators indicate that theemail,password, andsaltproperties are columns in the table. Theemailandpasswordcolumns are required, while thesaltcolumn is used for password hashing.
We shall hash user passwords with bcrypt before storing them in the database to secure user passwords.
The salt is a randomly generated value that is attached to an encrypted password to uniquely identify it in the event two or more users (unknowingly) register with the same passwords.
User Data Transfer Object
A data transfer object (DTO) is a design pattern used to define a data structure that carries data between different layers of an application, often between the client and the server. DTOs are used to encapsulate and transfer data in a structured and controlled way.
We shall have the following DTOs for this feature: the login DTO and the signup DTO.
Signup DTO
The DTO is used to validate the inputs that we get from the user when they signup. We use the class validator library to validate the database columns.
//signup.dto.ts
import { IsString, IsEmail, MinLength, Matches } from 'class-validator';

export class SignupDto {
  @IsEmail()
  email: string;

  @IsString()
  @MinLength(8)
  //regex for password to contain atleast one uppercase, lowercase, number and special character
  @Matches(/((?=.*\d)|(?=.*\W+))(?![.\n])(?=.*[A-Z])(?=.*[a-z]).*$/, {
    message:
      'password must contain uppercase, lowercase, number and special character',
  })
  password: string;

  @IsString()
  username: string;
}
export class SignupDto { ... }: This defines theSignupDtoclass.@IsEmail(): This decorator specifies that theemailproperty should be a valid email address.@IsString(): This decorator specifies that thepasswordandusernameproperties should be of string type.@MinLength(8): This decorator specifies that thepasswordproperty should have a minimum length of 8 characters.@Matches(/((?=.*\d)|(?=.*\W+))(?![.\n])(?=.*[A-Z])(?=.*[a-z]).*$/, { ... }): This decorator specifies that thepasswordproperty should match a specific regex pattern that enforces certain complexity rules:(?=.*\d): At least one digit (number) should be present.(?=.*\W+): At least one special character should be present.(?=.*[A-Z]): At least one uppercase letter should be present.(?=.*[a-z]): At least one lowercase letter should be present..*$: Match any characters (the.*before$ensures that the rule applies to the entire string).The provided
messageis used to specify a custom error message if the password does not meet the complexity requirements.
password: string;: This declares thepasswordproperty as a string within the DTO.username: string;: This declares theusernameproperty as a string within the DTO.
Login DTO
This DTO is used to validate the inputs that we get from the user when they log in. We use the class validator library to validate the database columns.
//login.dto.ts
import { IsEmail, IsString } from 'class-validator';

export class LoginDto {
  @IsEmail()
  email: string;

  @IsString()
  password: string;
}
Login Response DTO
This DTO is used to supply the database columns that are to be contained in the log-in response when a user logs in. We shall see this when we test the endpoints.
//loginResponse.dto.ts
export class LoginResponseDto {
  username: string;
  email: string;
}
User service
A service is used to manage the business logic and data manipulation from the repository. It helps with the separation of concerns and code reusability.
We shall add the user service to the services folder as we shall have the functions that create and sign in a new user.
//user.service.ts
import { Injectable } from '@nestjs/common';
import { User } from '../entities/user.entity';
import { InjectRepository } from '@nestjs/typeorm';
import { SignupDto } from '../dto/signup.dto';
import * as bcrypt from 'bcrypt';
import { LoginDto } from '../dto/login.dto';
import { LoginResponseDto } from '../dto/loginResponse.dto';
import { Repository } from 'typeorm';

@Injectable()
export class UserService {
  constructor(
    @InjectRepository(User)
    private userRepository: Repository<User>,
  ) {}

  findById(id: string): Promise<User> {
    return this.userRepository.findOne({ where: { id } });
  }

  private async hashPassword(password: string, salt: string): Promise<string> {
    return bcrypt.hash(password, salt);
  }

  async create(signupDto: SignupDto): Promise<User> {
    const { email, password, username } = signupDto;
    const user = new User();

    user.salt = await bcrypt.genSalt();
    user.password = await this.hashPassword(password, user.salt);
    user.email = email;
    user.username = username;

    try {
      await user.save();
      return user;
    } catch (error) {
      throw error;
    }
  }

  async signIn(loginDto: LoginDto): Promise<LoginResponseDto> {
    const { email, password } = loginDto;
    const user = await this.userRepository.findOne({ where: { email } });

    if (user && user.validatePassword(password)) {
      const userResponse = new LoginResponseDto();

      userResponse.username = user.username;
      userResponse.email = user.email;
      return userResponse;
    } else {
      return null;
    }
  }
}
Let's discuss this code:
@Injectable(): This decorator indicates that theUserServiceclass can be injected with dependencies. It's a crucial part of the Dependency Injection system in NestJS.constructor(@InjectRepository(User) private userRepository: Repository<User>) { ... }: This constructor injects theuserRepositoryas a dependency into theUserServiceclass. The@InjectRepositorydecorator is part of TypeORM and injects the repository instance associated with theUserentity.findById(id: string): Promise<User>: This method queries the database using the injecteduserRepositoryto find a user by theirid.private async hashPassword(password: string, salt: string): Promise<string>: This is a private method that asynchronously hashes a password using the bcrypt library. Thesaltis passed as an additional parameter for added security.async create(signupDto: SignupDto): Promise<User>: This method creates a new user based on the providedSignupDtoand persists it to the database. It generates a unique salt, hashes the password, and then saves the user entity to the database.async signIn(loginDto: LoginDto): Promise<LoginResponseDto>: This method handles user authentication. It attempts to find a user by email from the database, and if found, it validates the password using thevalidatePasswordmethod defined in theUserentity. If the credentials are valid, aLoginResponseDtois returned, containing the user's username and email.
Configuring Passport JS and JWT
Passport JS is an authentication middleware for Node JS applications. JSON Web Tokens(JWT) is a token-based authentication system that uses an encrypted token to manage user authentication.
To configure the two for user authentication we begin by installing the relevant packages as shown below.
npm install @nestjs/passport @nestjs/jwt passport-jwt bycrypt class-validator
We then create a constants file that shall contain an object that stores the JWT secret.
//constants.ts
// eslint-disable-next-line @typescript-eslint/no-var-requires
require('dotenv').config();

export const jwtConstants = {
  secret: process.env.JWT_SECRET,
};
export const jwtConstants = { secret: process.env.JWT_SECRET };: This line of code exports an object named jwtConstants that contains the JWT secret.
The JWT secret is used to sign and verify JWT tokens. In this case, the secret is retrieved from the environment variables using process.env.JWT_SECRET, which means you should have a variable named JWT_SECRET defined in your .env file.
Auth Module
We add the JWT and Passport JS modules to the auth module at the imports array. or the passport module, configure the default strategy to be JWT.
For the JWT module configure the secrets with the jwtConstants object. The signOptions is where we declare the lifetime of a town. The shorter the better to ensure user tokens are refreshed often as a security measure.
//auth.module.ts
import { Module } from '@nestjs/common';
import { AuthController } from './auth.controller';
import { AuthService } from './services/auth.service';
import { TypeOrmModule } from '@nestjs/typeorm';
import { User } from './entities/user.entity';
import { PassportModule } from '@nestjs/passport';
import { JwtModule } from '@nestjs/jwt';
import { jwtConstants } from './constants';
import { JwtStrategy } from './strategies/jwt.strategy';
import { UserService } from './services/user.service';

@Module({
  imports: [
    TypeOrmModule.forFeature([User]),
    PassportModule.register({ defaultStrategy: 'jwt' }),
    JwtModule.register({
      secret: jwtConstants.secret,
      signOptions: {
        expiresIn: '1h',
      },
    }),
  ],
  controllers: [AuthController],
  providers: [UserService, AuthService, JwtStrategy],
  exports: [JwtModule, PassportModule],
})
export class AuthModule {}
Adding JWT to the auth service
After configuring passport and JWT modules we proceed to use them in the auth service.
We begin by creating a user-jwt interface. An interface in TypeScript is a way to define the structure of an object, specifying what properties it should have and their types.
//user-jwt.interface.ts
import { LoginResponseDto } from '../dto/loginResponse.dto';

export interface UserJwtResponse {
  user: LoginResponseDto;
  accessToken: string;
}
export interface UserJwtResponse { ... }: This line defines an interface named UserJwtResponse. Here's what's defined within the UserJwtResponse interface:
user: LoginResponseDto;: This property specifies that theuserproperty of theUserJwtResponseobject should be of typeLoginResponseDto. It suggests that this property will contain data in the structure defined by theLoginResponseDtoclass.accessToken: string;: This property specifies that theaccessTokenproperty of theUserJwtResponseobject should be of typestring. This property is intended to hold a JSON Web Token (JWT) access token.
Authentication service
The auth service encapsulates user authentication logic within a NestJS application. It provides methods for validating users by ID, handling user registration, and managing user login.
//auth.service.ts
import { Injectable, UnauthorizedException } from '@nestjs/common';
import { UserService } from '../services/user.service';
import { SignupDto } from '../dto/signup.dto';
import { User } from '../entities/user.entity';
import { UserJwtResponse } from '../interfaces/user-jwt.interface';
import { LoginDto } from '../dto/login.dto';
import { JwtService } from '@nestjs/jwt';

@Injectable()
export class AuthService {
  constructor(
    private readonly userService: UserService,
    private readonly jwtService: JwtService,
  ) {}
  async validateUserById(userId: string) {
    return await this.userService.findById(userId);
  }

  async signUp(signupDto: SignupDto): Promise<User> {
    return this.userService.create(signupDto);
  }

  async login(loginDto: LoginDto): Promise<UserJwtResponse> {
    const userResult = await this.userService.signIn(loginDto);

    if (!userResult) {
      throw new UnauthorizedException('Invalid Credentials!');
    }

    const payload = { userResult };
    const accessToken = await this.jwtService.sign(payload);

    const signInResponse: UserJwtResponse = { user: userResult, accessToken };

    return signInResponse;
  }
}
Let us discuss the code:
@Injectable(): This decorator indicates that theAuthServiceclass can be injected with dependencies. This is a key feature of NestJS's Dependency Injection system.constructor(...): The constructor of theAuthServiceclass receives two dependencies:userServiceandjwtService. These dependencies are automatically injected when an instance ofAuthServiceis created.async validateUserById(userId: string) { ... }: This method is used to validate a user based on theiruserId. It uses the injecteduserServiceto find and return user information.async signUp(signupDto: SignupDto): Promise<User> { ... }: This method is used to handle user registration. It takes asignupDto(presumably containing user signup information) and delegates the registration process to theuserService. It returns the created user entity.async login(loginDto: LoginDto): Promise<UserJwtResponse> { ... }: This method handles user login. It takes aloginDto(presumably containing user login credentials) and proceeds as follows:It calls the
signInmethod of theuserServiceto attempt user authentication.If authentication is successful, it generates an access token using the injected
jwtService.It constructs a response object of type
UserJwtResponsecontaining the authenticated user's information and the generated access token.If authentication fails (no user found or invalid credentials), it throws an
UnauthorizedException.
The
signInmethod is likely defined in theuserServiceand handles user authentication, possibly returning the authenticated user's data ornullif authentication fails.
Jwt strategy
The JWT strategy class defines a JWT-based authentication strategy using Passport in a NestJS application. This strategy is an essential component of JWT-based authentication in the application.
//jwt.strategy.ts
import { Injectable } from '@nestjs/common';
import { PassportStrategy } from '@nestjs/passport';
import { ExtractJwt, Strategy } from 'passport-jwt';
import { AuthService } from '../services/auth.service';
import { jwtConstants } from '../constants';

@Injectable()
export class JwtStrategy extends PassportStrategy(Strategy) {
  constructor(private authService: AuthService) {
    super({
      jwtFromRequest: ExtractJwt.fromAuthHeaderAsBearerToken(),
      secretOrKey: jwtConstants.secret,
    });
  }

  async validate(payload: any) {
    return await this.authService.validateUserById(payload.sub);
  }
}
Let's discuss the code:
@Injectable(): This decorator indicates that theJwtStrategyclass can be injected with dependencies. It's important for Dependency Injection to work properly.export class JwtStrategy extends PassportStrategy(Strategy) { ... }: This line defines theJwtStrategyclass, which extendsPassportStrategyfrom the@nestjs/passportmodule. TheStrategyparameter passed toPassportStrategyspecifies the type of authentication strategy being implemented.constructor(private authService: AuthService) { ... }: The constructor of theJwtStrategyclass receives an instance of theAuthServiceas a dependency. This dependency is automatically injected when an instance ofJwtStrategyis created.super({ ... }): This line calls the constructor of the parent class (PassportStrategy) and provides options for configuring the JWT strategy. Specifically:jwtFromRequest: ExtractJwt.fromAuthHeaderAsBearerToken(): This specifies that the JWT will be extracted from theAuthorizationheader as a Bearer token.secretOrKey: jwtConstants.secret: This uses the JWT secret from thejwtConstantsobject (likely defined elsewhere) for token verification.
async validate(payload: any) { ... }: This method is the heart of the JWT strategy. It's called when a JWT is successfully decoded and validated. Thepayloadparameter contains the information stored in the JWT payload, including the user's ID (sub).Inside this method, the
validateUserByIdmethod of the injectedauthServiceis called with the user's ID extracted from the payload.The
validateUserByIdmethod is expected to return a user entity ornull, indicating whether the user exists or not.
Authentication controller
The auth controller is responsible for handling authentication-related HTTP requests. It delegates the actual authentication and registration logic to the methods of the injected auth service.
//auth.controller.ts
import { Body, Controller, Post, Put } from '@nestjs/common';
import { AuthService } from './services/auth.service';
import { SignupDto } from './dto/signup.dto';
import { User } from './entities/user.entity';
import { LoginDto } from './dto/login.dto';
import { UserJwtResponse } from './interfaces/user-jwt.interface';

@Controller('auth')
export class AuthController {
  constructor(private readonly authService: AuthService) {}

  @Post('signup')
  async signup(@Body() signupDto: SignupDto): Promise<User> {
    return this.authService.signUp(signupDto);
  }

  @Put('login')
  async login(@Body() loginDto: LoginDto): Promise<UserJwtResponse> {
    return this.authService.login(loginDto);
  }
}
Let us discuss the code:
@Controller('auth'): This decorator sets the base route for theAuthControllerto'auth', which means that the routes defined within this controller will be accessed under the/authendpoint.export class AuthController { ... }: This line defines theAuthControllerclass.constructor(private readonly authService: AuthService) { ... }: The constructor of theAuthControllerclass receives an instance of theAuthServiceas a dependency. This allows the controller to use methods and functionality provided by theAuthService.@Post('signup'): This decorator specifies that thesignupmethod will handle HTTP POST requests to the/auth/signupendpoint.async signup(@Body() signupDto: SignupDto): Promise<User> { ... }: This method is responsible for user registration. It receives asignupDtocontaining user registration data from the request body.The
signupDtois passed to thesignUpmethod of the injectedauthService, which handles the user registration process.The method returns a
Promise<User>which presumably represents the created user entity.
@Put('login'): This decorator specifies that theloginmethod will handle HTTP PUT requests to the/auth/loginendpoint.async login(@Body() loginDto: LoginDto): Promise<UserJwtResponse> { ... }: This method is responsible for user login. It receives aloginDtocontaining user login credentials from the request body.The
loginDtois passed to theloginmethod of the injectedauthService, which handles the user authentication process.If authentication is successful, the method returns a
Promise<UserJwtResponse>containing user information and an access token.
Running a migration
Before testing the endpoints we need to create and run a migration to update the database schema with the user's table and columns.
The command we shall use to create a migration is as shown below. It matches what we have configured in the datasource file.
npm run typeorm:generate-migration migrations/CreateAuthTable
Then we follow that command with another one that runs the migration.
npm run typeorm:run-migrations
Testing the endpoints
After successfully running the migration, we proceed to test the endpoints. Run the API using this command as it will run the API in watch mode.
npm run start:dev
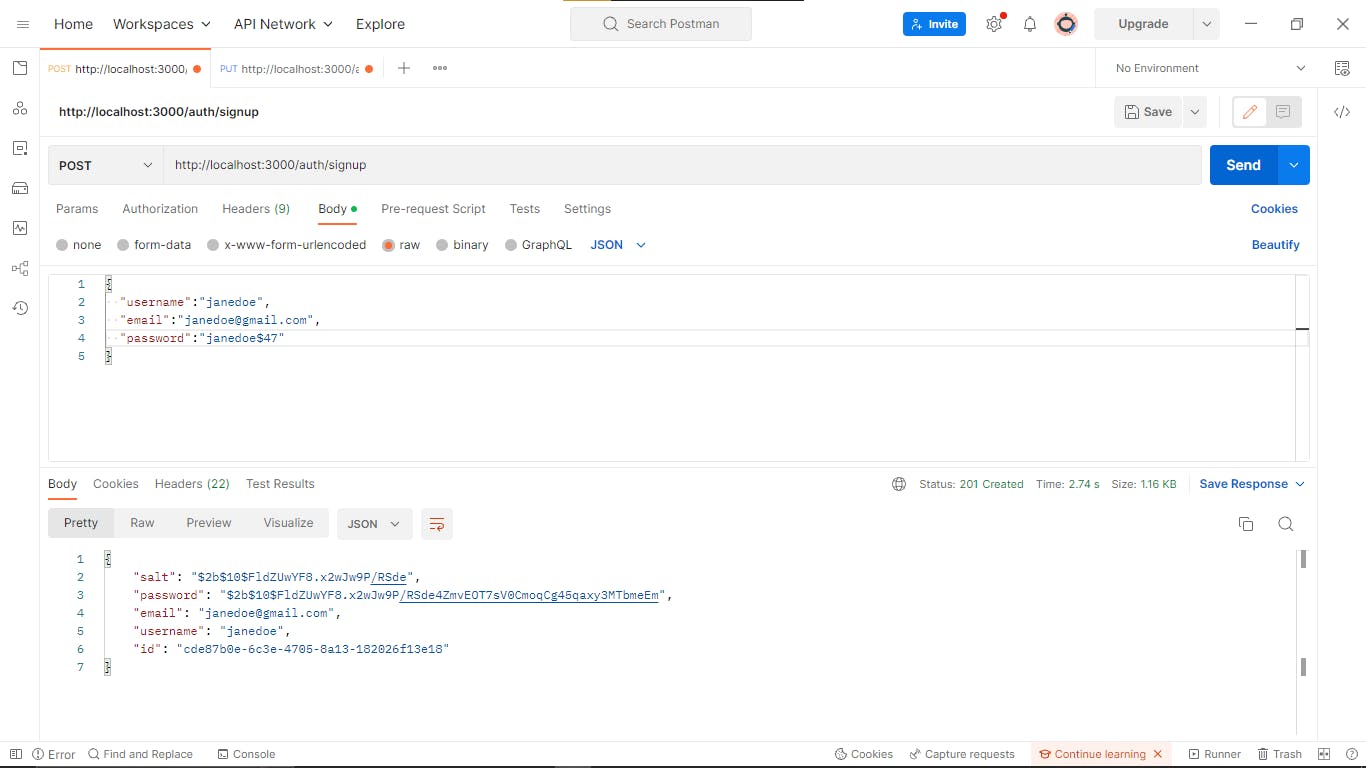
Sign up endpoint
In Postman, we create the body of the request we want to make which will create a new user.
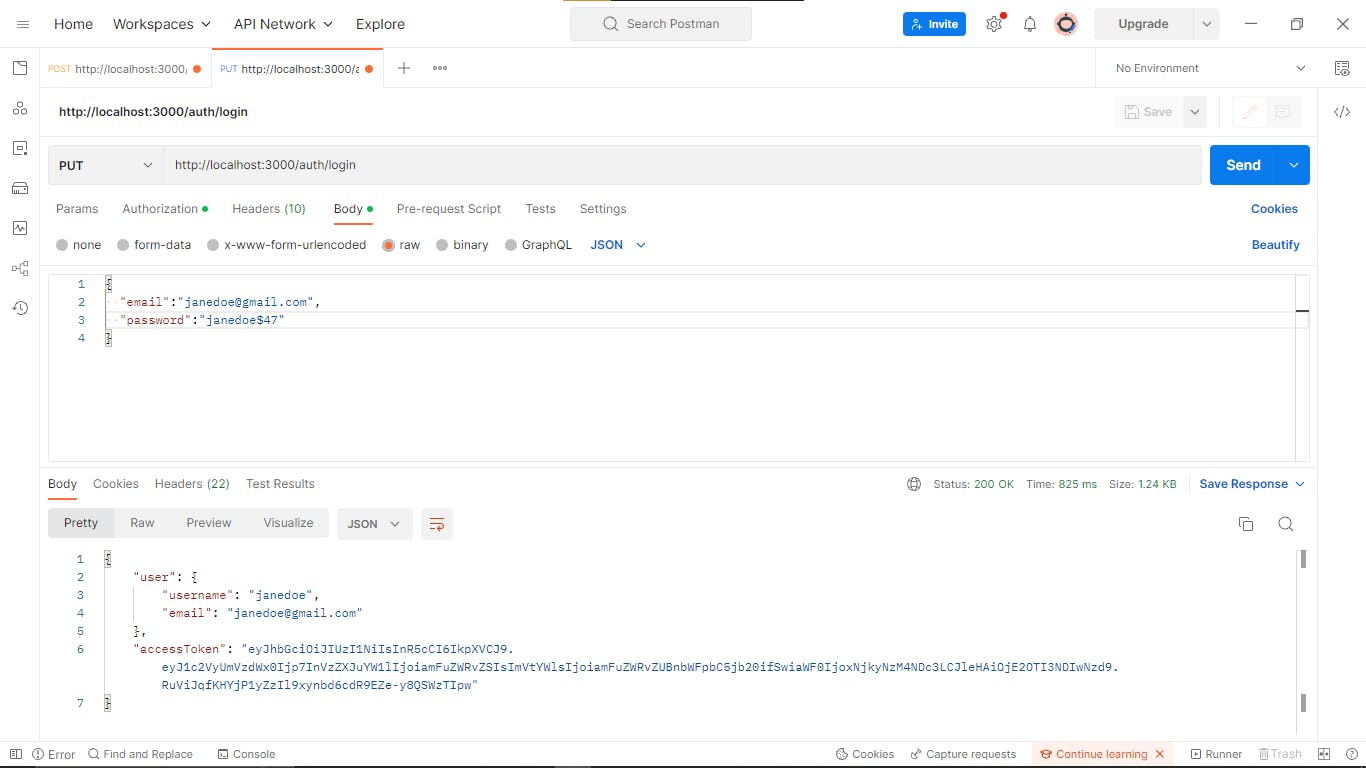
Login endpoint
In Postman, we create the body of the request we shall use to log in the user we created.
The GitHub repository with the code for this project is here. Feel free to comment with any questions you may have. Until next time, may the code be with you.